Paint a Straight Line for a Professional Finish
by Guest Post on Mar 26, 2010
It can honestly be said that sometimes something as simple as a straight line can make a huge difference. When you are painting, knowing how to paint so that the finish is neat and even can mean the difference between adding value and beauty to your home and taking away from the same. Straight lines and clean trim make the room look professionally styled, and will really improve the overall look of the décor. There are several ways to discover how anyone can paint in a straight line with some care, patience, and effort.
Contrary to everything you learn in painting class, you do not have to paint the room before the baseboards, trim, or molding. In fact, it is better to start by painting these objects instead of finishing with them. It is much simpler to touch up the trim than to go back and touch up walls, and trim touchups are much less noticeable overall.
Start by painting all of the trim, including baseboards, doors/window trim, molding, and similar areas. Give this coat at least one full day to dry, and then add painter’s tape on all sides. You may choose to allow a few more hours for drying if the weather is cool, depending on the area you live in and the quality of paint.
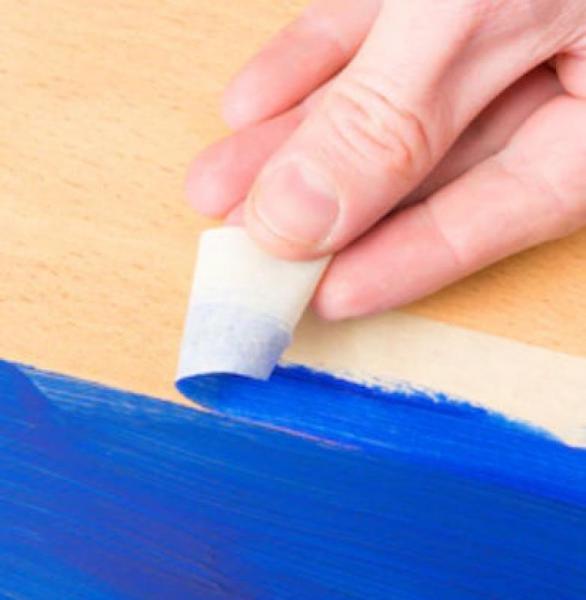
Once the paint is dry, and the tape is applied, paint away in the room. You can do this one wall at a time, or do all four walls at once, depending on your schedule or budget requirements. Make sure that the entire room has had at least a few hours to dry before you remove the tape from the trim. In most cases, it is best to wait about eight hours, and then remove a test strip in a less conspicuous part of the room. This will ensure that your paint does not come off with the tape.
After you remove the tape, touch up any areas that need some work. Allow it to dry, and the room is ready for furniture and accessories. Remember to allow extra drying time during the winter or cold weather, since it takes longer, and for larger rooms. If you are painting the ceiling, consider doing that immediately after the trim, to prevent drip mistakes on the walls after they are completed.
If you are painting a rough wall, add a coat of base paint to the tape to prevent bleeding. Bright colors tend to bleed more, so make sure that the base paint is the shade of the wall or trim under the tape for best results. Press down firmly on the tape, and paint with a wider brush to ensure maximum efficiency and professional results.
Surrounding areas that are wood, smooth, or paneled need special attention. Instead of tape and paint, add clear acrylic varnish as the base coat over the paint. If there is any bleeding, it will be absorbed into the clear coat instead of seeping into the surrounding area and creating a mess that is nearly impossible to fix completely.
Popular Articles
Three Places to Spend Money on the Exterior of Your Home
When you have the exterior of your home remodeled, you are investing, time, energy and convenience into the project and you want to make sure that...
108463 Views
Homemade Headboards-Make an Upholstered or Wooden Headboard
Homemade headboards can add a lot of personality to any bedroom. They can be coordinated with existing furniture and room decor or they can be the...
81312 Views
When to Use a Brush, Roller or Sponge Brush
Brushes are a good choice for painting trim and woodwork. They are also useful for cutting in the edges around the top and bottom edges and corners...
74237 Views
Creating a Cottage Kitchen with Bead Board
Kitchen decor can range from modern and bold to elegant and elaborate by using strategic kitchen pieces. One of the most popular decorating trends...
59674 Views
Gas Fireplace Diagnostics and Troubleshooting
Follow these steps for diagnosing and troubleshooting Gas Fireplaces repairs. For the average DIYer, this may seem intimidating, depending on the...
36547 Views
Latest Articles
Signs You Need Professional Plumbing Repair: Don’t Ignore These Warning Signs
Ignoring the signs of a pending plumbing disaster can lead to significant damage and costly repairs. For instance, homeowners might not realize...
on Jan 20, 2026
Beneath the Surface: Why Professional Trenchless Sewer Line Repair
Beneath the Surface: Why Professional Trenchless Sewer Line Repair is Essential for Modern Homeowners
on Jan 14, 2026
Hydro Jetting Services: Unclog Your Pipes with the Power of Water
When faced with stubborn clogs and slow drains, conventional solutions often fall short. But with the innovation of hydro jetting services,...
on Dec 15, 2025
Why Professional Heat Pump Installation is Key to Maximizing Efficiency and Longevity
Heat pumps are a highly efficient means of heating and cooling homes, reducing energy costs and contributing to environmental sustainability. To...
on Dec 15, 2025
Why Professional Boiler Repair is Essential for Home Safety and Comfort
Maintaining a warm and safe home environment is paramount for any homeowner. Your home's boiler system plays a critical role in this, but what...
on Nov 5, 2025
Featured Articles
What Type of Licensed Contractor Should You Hire?
on Feb 28, 2017
Hire Contractors / Estimates

Looking for a specialty project? There are many types of contractors available for your home improvement needs. Finding the right type of...
Actions
Top Categories
- Garden / Landscaping / Patio — 264
- Kitchen / Bathrooms — 240
- Real Estate / Finance — 203
- Appliance / Repair — 186
- Interior Design / Decor — 184
- HVAC / Air Conditioning — 150
- Cleaning / Maintenance — 144
- Improvements / Remodeling — 131
- Plumbing / Basements — 121
- Floors / Tile / Hardwood — 116
- Safety / Security — 114
- Doors / Garages — 113
Articles Archive
More DIY Articles
5 Things to Look for When Looking for Green Appliances
Today, our lives revolve around electrical appliances. They have become an integral part of our daily activities. But with the benefits they bring,...
Do Not Stop at New Kitchen Doors
So, you’ve looked through brochures and seen what the TV chefs use. You’ve decided on colors and know exactly what your kitchen layout is going to...
Tulip Planting Guide
The gems of bulb gardening are tulips. Tulips offer a wide array of colors and a variety of flower shapes and sizes. Flower colors include pink,...
How to Know if Your Furnace Unit Needs to be Replaced
The right heating system will improve your comfort and safety, especially during the winter season. The best heating system will enhance the...
7 Tips to Increase the Value of Your Property
If you are considering renovating or selling your property, it should be able to add value to space. Several projects that are aimed at increasing...