Step-by-Step Guide to Making a Wooden Kitchen Bar Stool
by Guest Post on May 15, 2012

It's handy to have a couple of wooden bar stools in your kitchen, for sitting on whilst preparing food, reading a magazine while enjoying a cup of coffee, or for relaxing on whilst entertaining guests. The backless bar stool here has a simple and versatile design and can be finished in whatever color you choose to match your kitchen's décor.
What You Will Need
Materials:
- Wood: 90 x 19mm, 1 x 4.2m length
- 70 x 19mm, 1 x 1.8m length
- 40 x 19mm, 1 x 1.8m length
- Wood Glue
- Screws
- Nails
Tools:
- Sliding Bevel
- Protractor
- Saw
- Drill
- Hammer
- Tape Measure
- Pencil
- Plane
The wood will be cut to make the following parts, as shown on the diagram:
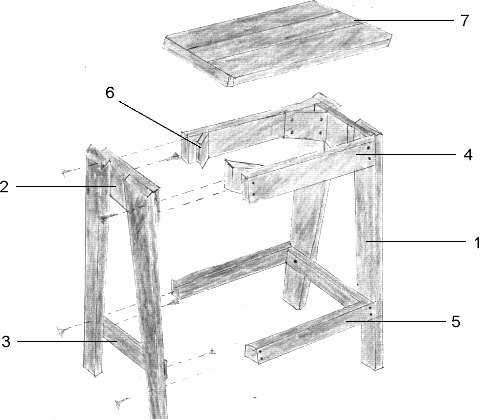
90 x 19mm
Legs (1) = 4 x 650mm lengths
Seat Slats (7) = 3 x 450mm lengths
70 x 19mm
Top Spreaders (2) = 2 x 230mm lengths
Top Rails (4) = 2 x 360mm lengths
Corner Blocks (6) = 4 x 100mm lengths
40 x 19mm
Bottom Spreaders (3) = 2 x 315mm lengths
Bottom Rails (5) = 2 x 360mm lengths
Instructions making your Bar Stool
Step 1 Cut the legs, giving each one a 5 degree splay. To do this, use the protractor to set your sliding bevel to 85 degrees. Use a pencil to mark the angle on your length of 90 x 19mm timber and cut along the line with a saw. Measure 630mm, mark the angle again and cut. Do this another 3 times until you have your 4 stool legs (1).
Step 2 On each leg, measure 45mm across the bottom and 400mm up the inside edge. Use your pencil to mark these points and then join them up. Cut along the pencil line to taper the legs.
Step 3 Use a plane to smooth off the cut edges. Remember to always work in the direction of the grain and plane downwards, taking thin shavings.
Step 4 Cut the top and bottom spreaders (2 and 3). The bottom side rails need to follow the splay of the legs, so each bottom spreader needs to have a 5-degree angle cut at each end. Lay one pair of legs on your work surface. Put pencil marks 19mm in from the top outside edge of each leg, and 19mm in from the outer edge, 150mm up from the bottom. Use high strength wood glue to glue and then screw the top and bottom spreaders in place, making sure you leave space for the rails.
Step 5 Cut the top and bottom rails (4 and 5). Glue and nail them to the spaces left on the legs in the previous step. Secure with screws from the legs into the end of each rail. Stand the stool upright to check its level and square, and make any necessary adjustments if you need to.
Step 6 Make the 4 corner blocks (6), cutting a 45 degree miter cut at each end. Screw them into the corners of the top spreaders and rails.
Step 7 Cut the 3 slats (7) to make the seat. Remove the sharp outside corners by cutting a small 45 degree triangle off each one. Glue and nail the slats to the stool, making sure you put the middle slat in position first.
Step 8 Use glued in dowelling to plug the counter bored screw holes. Cut the dowelling so it's flush with the wood.
Step 9 Sand all surfaces to get a smooth finish and then apply a coat of a hardwearing polyurethane coating to give your stool a protective finish.
About The Author
Dan O'Sullivan is a freelance writer with an interest in woodworking projects. He is a contributor to www.GetBarStools.com, where you can find a selection of discount bar stools as well as helpful advice on choosing kitchen bar stools for your home.
Popular Articles
Three Places to Spend Money on the Exterior of Your Home
When you have the exterior of your home remodeled, you are investing, time, energy and convenience into the project and you want to make sure that...
108278 Views
Homemade Headboards-Make an Upholstered or Wooden Headboard
Homemade headboards can add a lot of personality to any bedroom. They can be coordinated with existing furniture and room decor or they can be the...
81257 Views
When to Use a Brush, Roller or Sponge Brush
Brushes are a good choice for painting trim and woodwork. They are also useful for cutting in the edges around the top and bottom edges and corners...
74197 Views
Creating a Cottage Kitchen with Bead Board
Kitchen decor can range from modern and bold to elegant and elaborate by using strategic kitchen pieces. One of the most popular decorating trends...
59630 Views
Gas Fireplace Diagnostics and Troubleshooting
Follow these steps for diagnosing and troubleshooting Gas Fireplaces repairs. For the average DIYer, this may seem intimidating, depending on the...
36511 Views
Latest Articles
Signs You Need Professional Plumbing Repair: Don’t Ignore These Warning Signs
Ignoring the signs of a pending plumbing disaster can lead to significant damage and costly repairs. For instance, homeowners might not realize...
on Jan 20, 2026
Beneath the Surface: Why Professional Trenchless Sewer Line Repair
Beneath the Surface: Why Professional Trenchless Sewer Line Repair is Essential for Modern Homeowners
on Jan 14, 2026
Hydro Jetting Services: Unclog Your Pipes with the Power of Water
When faced with stubborn clogs and slow drains, conventional solutions often fall short. But with the innovation of hydro jetting services,...
on Dec 15, 2025
Why Professional Heat Pump Installation is Key to Maximizing Efficiency and Longevity
Heat pumps are a highly efficient means of heating and cooling homes, reducing energy costs and contributing to environmental sustainability. To...
on Dec 15, 2025
Why Professional Boiler Repair is Essential for Home Safety and Comfort
Maintaining a warm and safe home environment is paramount for any homeowner. Your home's boiler system plays a critical role in this, but what...
on Nov 5, 2025
Featured Articles
What Type of Licensed Contractor Should You Hire?
on Feb 28, 2017
Hire Contractors / Estimates

Looking for a specialty project? There are many types of contractors available for your home improvement needs. Finding the right type of...
Actions
Top Categories
- Garden / Landscaping / Patio — 264
- Kitchen / Bathrooms — 240
- Real Estate / Finance — 203
- Appliance / Repair — 186
- Interior Design / Decor — 184
- HVAC / Air Conditioning — 150
- Cleaning / Maintenance — 144
- Improvements / Remodeling — 131
- Plumbing / Basements — 121
- Floors / Tile / Hardwood — 116
- Safety / Security — 114
- Doors / Garages — 113
Articles Archive
More DIY Articles
How to Know if Mold is in Your Walls
Mold is a fungus and lives both indoors and outdoors. The problem with mold growth indoors is that it becomes dangerous to our health since it...
Flawless Renovation: 10 Considerations Before Renovating your Kitchen
Kitchen renovation requires careful planning including your budget and kitchen space. That is why you should consider things before the renovation...
Hardwood Flooring- How to Install in a Right Way?
Hardwood flooring is in vogue these days as it provides a touch of class and adds elegance to the overall décor. Its installation involves some...
Bathroom Tile Installation -- Do not Make This Mistake
Ever noticed cracks in ceramic tile floors? That is a common sight and it usually has the same cause. The common cause is taking a shortcut at the...
Step by Step Guide on How to Use a Motorized Tiller
There are a lot of people out there who have purchased a tiller recently and are finding it quite challenging to use the machine. Well, unlike the...