DIY Home Build Solar System Guide
by Guest Post on Dec 17, 2010
With this site I will tell you how I made my Home Build Solar System for a fraction of the shop price and how you can make your own system, it’s much easier than you think. The building process is quite simple (when you’ve got a little technical background) and the to be used materials you can mostly buy locally.
The initial intention of the Solar System
I could see that my electricity bill was increasing year after year, just because the modern-day appliances can’t be turned off anymore and before I noticed I had many appliances in the house which are on standby day in day out.
This all not only harm the environment but also my bank account as I am using electricity for nothing.
Not to solve this problem (as this is how appliances are made and I can’t change this) I started to look into renewable energy to compensate for my unneeded losses and to take some pain away from my bank account.
Wind energy was no option due to the area I’m living in, hydroelectricity is no option as I live in a flat country with next to no rivers so solar power was the best solution.
Then the price of solar systems appears to be horrendous, far too much that the system ever would produce in its estimated 20-year lifespan.
So I tried to get governmental grants for this project but grants for those kinds of systems where limited and did I miss out.
But I still wanted a solar system but I didn’t want to pay the high price, so I decided to build the panels myself.
Yes, you see this right, I wanted to build my solar system and I can tell you now it’s possible and well with materials bought locally in DIY shops and easy to obtain parts from the Internet.
No, I’m not a technical wonder and I don’t have lots of experience working with electricity, I just looked around and taught myself how solar panels are made, how others might have done it and made out of this a workable plan of how I could do it.
Start of the challenge
After I did my homework I found out that there was a solar cell manufacturer just a few hours away from my house who could supply me with the needed cells (otherwise I could buy those online as they’re easy to obtain from other sites).
With the information, I collected from various sources I made a wiring diagram and did I got an ordinary glass from a local supplier.
Tools I needed came from my local DIY store and I was ready to start.
See the needed materials list below witch not only states all the needed materials but also the price I paid for it and the shop I bought them from.
The material list is for one panel only and the list of the total system is for 2 panels, one inverter and production meter. Installation material like wire, junction boxes, screws and holding brackets I didn’t have to buy as those I still had in the shed or made my self.
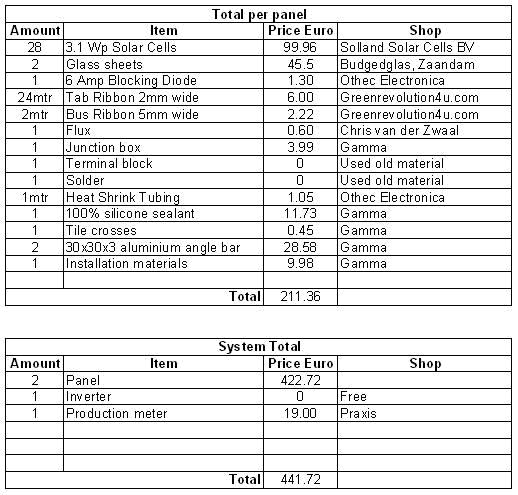
List of materials I needed to make one panel and price I bought them for.
Building process
I soldered the solar cells according to the wiring diagram in series as this added the voltage of each cell together to achieve the desired (and highest) output. I made a 28 cell panel (4 strings of 7 cells) as this is fitting the best in my garden and would give me 28x0.5V=14V (theoretically). The amperage I didn’t know yet as I bought B quality cells to play around with (this saved me some expenses to mess around with).
When I finished soldering the cells, the cells were upside down (as I soldered the backside of the cells last) so could place on the back of each cell a little bid silicone and glued the cells on a 4mm glass sheet (this sheet will eventually become the back of the panel).
Now I left it all to dray and the silicone to vapor out (it’s really important to let the silicone vapor out real good as the vapors react with the solder on the cells).
Next, I turned the glass sheet over and placed small tile crosses (they use to place tiles on a wall or on the ground to keep a standard distance between the tiles) in between the cells so that at a later stage of the building process the 2 plates of glass will form a stiffer construction. When they are in place I did put silicone sealant all around the edge of the glass plate at a distance of about 3 cm from the edge (which I left empty for filling at a later stage).
Then I placed the other plate of glass on top of it so the cells are now sandwiched between 2 glass sheets of 4mm thick (yes I just made double glassing with solar cell embedded, how easy can a plan be).
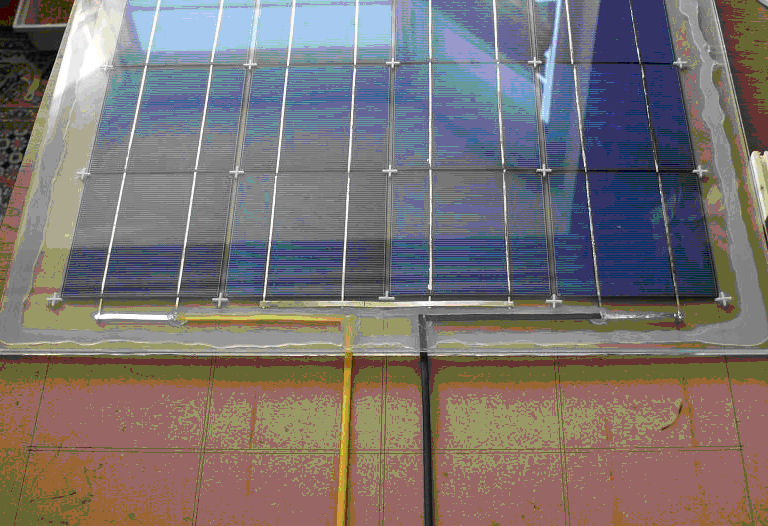
The cells sandwiched between 2 sheets of glass, you can see the cells hooked in series with a - at the right (black) and + at the left (yellow).
And left it all to dry for a minimum of 24 hours, the longer the better due to the sealant vapors.
Then there is still open space between the 2 glass plates on the outer edge and I filled this with more sealant.
Now I have 2 sealant seals, so if one sealant line leaks than there is the 2nd line as a backup.
I leave this to dry for another 3 days.
When the sealant has dried fully, I took some aluminum profile (aluminum angle bar) to make a frame to protect the glass and to make the panel stronger. 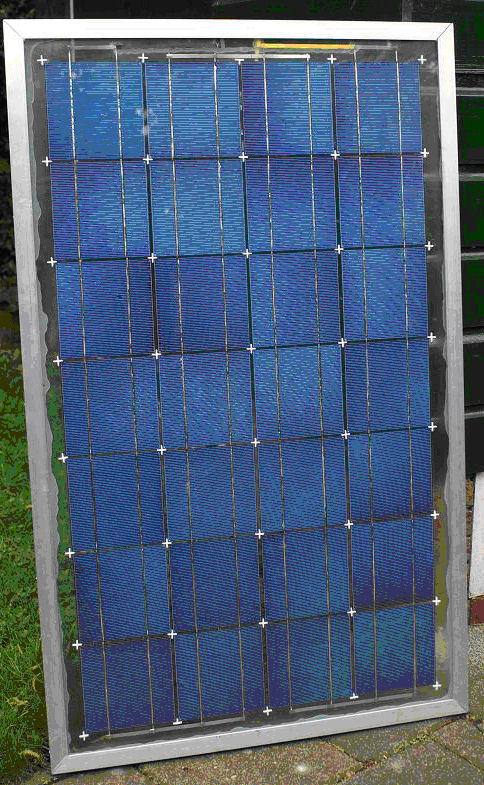
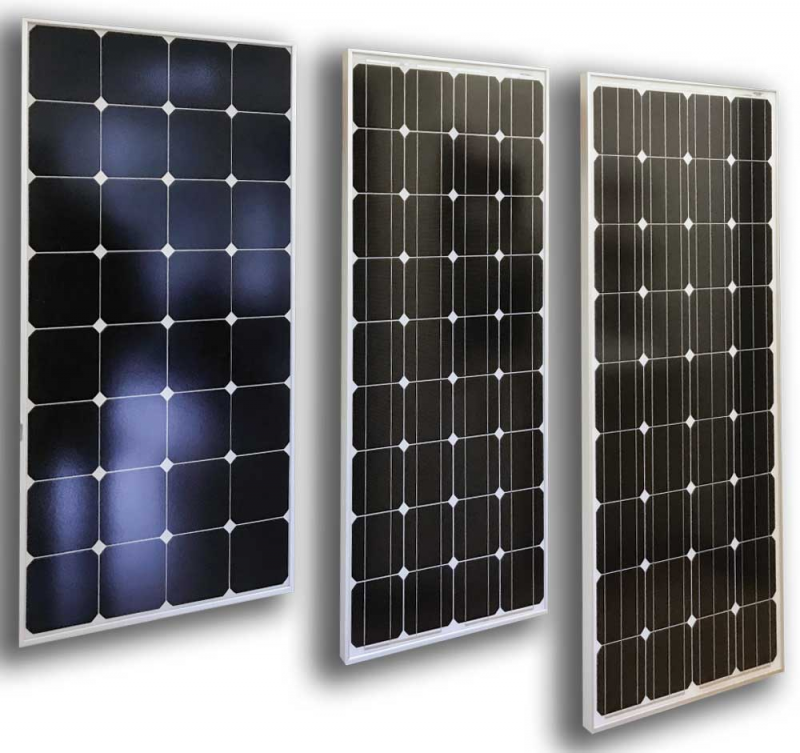
One finished panel
At the back of the panel, I made a junction box with a terminal block.
At one side of the block the + and – from the panel is going in and at the outside will go the wire going to the inverter.
In the junction box is also a diode in between the + from the panel to the + going to the inverter, this will prevent electric current to flow to the panel when the panel is not producing any electricity (like at night).
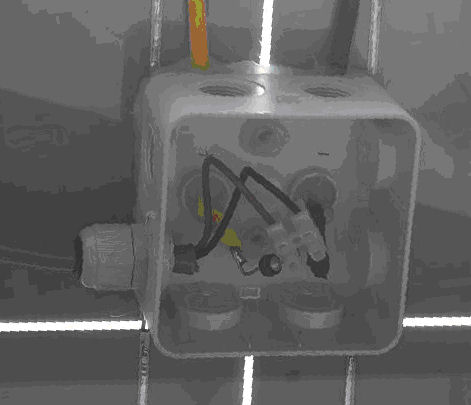
The junction box at the back of the panel with the blocking diode.
Inverter
I contacted the local solar panel shop for a suitable inverter as this one needs to be small (remember that I only make a small amount of electricity with this panel).
In the shop was a small inverter laying around which could not be sold, and I could have this for free as it would otherwise be in the shop for a few more years.
The inverter is an OK-4 one, starting at 24V to 50V and a max of 100W.
So this learned me that just one panel would not be enough as this would give me only 14V, so I needed a 2nd one and also hooked up in series so I would get 28V which is enough to get the inverter going.
The 14V appeared to be enough but you could see that this was not a strong current so guess what, I made the 3rd panel and now the production is nice and steady.
I know that this inverter can go to a max of 100W and my 3 panels give more (135Wp) but this maximum my panels give will be chocked back by the inverter.
Whatever the inverter gets more than he can handle is burned off as heat.
Yes, I know what you’re thinking; I’m wasting electricity right at the course.
That’s true, but only in the middle of the day for a few hours when the sun is at its strongest and optimum angle to the panels and most of the day (actually most days) this is not the case.
Now I start producing right away when the sun comes up till it’s going down, just thanks to the fact that this inverter can work at a low voltage.
I gain more by producing in total at the lower range (every day) than a few hours (at some days) at the top range.
Figure facts
As that the OK-4 inverter hasn’t got a build-in display to see how much output it gives I needed a separate production meter.
A guess what, I was also not prepared to pay the full “solar panel world price” for this neither.
I went to a local DIY store and bought an ELRO M12 Power Calculator, which is actually mended for calculating the usage of electrical appliances but works also fine to calculate any solar production (this calculator is working both ways it can give and take electricity from the net).
And this calculator plugs straight into the mains power supply with no difficult wiring (that’s what we need).
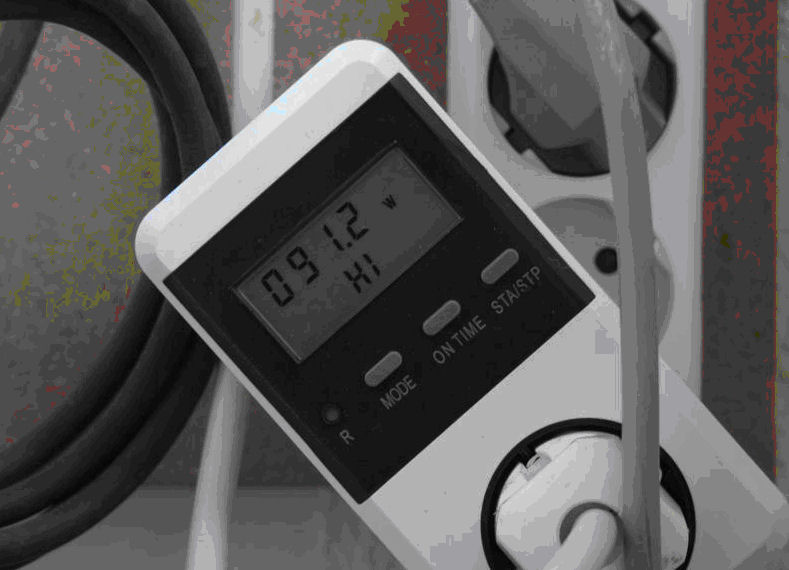
The ELRO M12 production meter with 91W of the home build solar power.
Factory figures gave me that each cell gives 0.5V x 6A = 3Wp, but this in perfect circumstances. For a whole panel, this would mean 28 cells x 3Wp = 84Wp.
But from previously gained knowledge I know that this is always given as a to optimistic figure and that around 20% less production will be achieved in real life.
In this case, this would mean a true expected production figure of 67Wp.
My panels are certainly not facing the optimum way, but this is for now also not the meaning (as silly as it sounds).
The panels are placed at a 10-degree angle (instead 35) and not exactly facing the South.
But where they are placed in a temporary installation with the reason that I want to see how they’re behaving in real weather with cold temperatures, lots of rain and a blasting sun.
A real setup will come shortly.
Taking all of this into account the panels are producing 15V x 3A = 45Wp each.
Concluding that the voltage of the cells is used to the maximum.
The amperage can go higher, this can be done by changing the angle of the panels more into the sun, but is currently not possible due to their placing location.
If I see that voltage wise the maximum output has been reached, I can say that the panels are working fine and do they give so far an average of 500Wh per week.
Weekly production record from week 17 till 34.
Now the critics among us will say that this is nothing, but given that the panels have the potential to produce more as if I only change the facing/angle, the panels are smaller than a standard panel plus it is only 3 panels they do fine.
Plus I aimed to overcome the standby appliances in the house so you can say that I succeeded.
Apart from the durability (this test is currently ongoing), I can say that a homemade panel is working just as good as a panel bought in a shop.
The 3 panels harvesting the sun.
Future thoughts
My future plan is first testing the panels for their durability as so far I mainly focused on making the panels and do I not really know what they will do after being exposed to the weather for a long period of time.
After this it’s time to make a sun tracker and make more panels but than bigger ones.
Than the panels will give more output due to the size and will always be facing under the right angle to the sun for maximum output.
And it speaks for it self that all gained knowledge will be published on the site for everyone to access.
And for the critic, yes you’re right this is not free electricity as I had to pay for the parts but when I reached the breakeven point the costs are paid back and then the system will give me free energy by harvesting the sun.
Why wait till tomorrow if you can start saving money today?
Popular Articles
Three Places to Spend Money on the Exterior of Your Home
When you have the exterior of your home remodeled, you are investing, time, energy and convenience into the project and you want to make sure that...
98672 Views
Homemade Headboards-Make an Upholstered or Wooden Headboard
Homemade headboards can add a lot of personality to any bedroom. They can be coordinated with existing furniture and room decor or they can be the...
75163 Views
When to Use a Brush, Roller or Sponge Brush
Brushes are a good choice for painting trim and woodwork. They are also useful for cutting in the edges around the top and bottom edges and corners...
72248 Views
Creating a Cottage Kitchen with Bead Board
Kitchen decor can range from modern and bold to elegant and elaborate by using strategic kitchen pieces. One of the most popular decorating trends...
53574 Views
Gas Fireplace Diagnostics and Troubleshooting
Follow these steps for diagnosing and troubleshooting Gas Fireplaces repairs. For the average DIYer, this may seem intimidating, depending on the...
30989 Views
Latest Articles
How Much Does It Cost To Take A Bath?
Plumbers know that a bath may seem like a relaxing luxury, but the real cost extends far beyond your water bill. The average soak uses 35 to 50...
on Apr 8, 2025
10 Concrete Patio Ideas on a Budget
A concrete patio can be a game-changer for your outdoor space. It is durable, versatile, and can be customized to fit your style. But what if you...
on Mar 25, 2025
Tips for Creating a Stunning Personalized Photo on Canvas
Order the unique beauty of a personalized photo on canvas and bring your memories to life. With a customized photo on canvas, you can transform...
on Mar 7, 2025
Best Areas to Buy Property in Singapore for Long-Term Growth
Singapore's real estate market remains one of the most stable and lucrative in the world. With limited land supply, strong governmental...
on Feb 18, 2025
Troubleshooting Excess Water in Your HVAC Secondary Condensate Drain Pan
When maintaining your air conditioning system, it is easy to overlook the condensate drain pan - until excess water starts pooling in places where...
on Jan 12, 2025
Featured Articles
What Type of Licensed Contractor Should You Hire?
on Feb 28, 2017
Hire Contractors / Estimates

Looking for a specialty project? There are many types of contractors available for your home improvement needs. Finding the right type of...
Sponsored Articles
Best Areas to Buy Property in Singapore for Long-Term Growth
on Feb 18, 2025
Real Estate / Finance

Singapore's real estate market remains one of the most stable and lucrative in the world. With limited land supply, strong governmental...
Actions
Top Categories
- Garden / Landscaping / Patio — 264
- Kitchen / Bathrooms — 240
- Real Estate / Finance — 203
- Appliance / Repair — 186
- Interior Design / Decor — 184
- HVAC / Air Conditioning — 148
- Cleaning / Maintenance — 144
- Improvements / Remodeling — 131
- Plumbing / Basements — 118
- Floors / Tile / Hardwood — 116
- Doors / Garages — 113
- Safety / Security — 113
Articles Archive
More DIY Articles
4 Ways to Watch for Pests When You Buy a New Home
It is springtime! The birds are chirping, the flowers are blooming, and you are house-hunting! But with the turning of the seasons comes increased...
Cleaning the Concrete Flooring in Your Home
When you think about cleaning the floor, concrete is probably not the first thing that comes to mind. A concrete driveway, garage, porch or patio,...
How to Fund Your Home Improvement Project
Planning to have your home remodeled anytime soon? You better prepare for it financially. A good amount of money is needed to push through with a...
Basic Air Conditioner Maintenance Tips
Come summers, and we start worrying about our air conditioners' maintenance. Just like any other electronic device, Air conditioners also need...
Repairing Wall Electrical Outlets
Wall electrical outlets rarely cause trouble; however sometimes they get loose and only need tightening. First try plugging in a different lamp or...