
Replacing Damaged Shingles
by Guest on May 7, 2012

If in the course of inspecting your roof, you find a damaged shingle, it is a good idea to replace it. The procedure is easy. First a note about safety: FALLING FROM THE ROOF CAN KILL OR INJURE YOU! Don't work on the roof if you don't have the appropriate safety equipment like a safety harness. If you are uncomfortable on the roof, call a contractor. See the notes for tips about real-world situations. These instructions are for regular fiberglass/asphalt shingles.
Method #1 of Repair Damaged Shingles
STEP 1:
The first step is to assess the damage to the shingle. You should do this in warm weather to avoid shingle breakage.
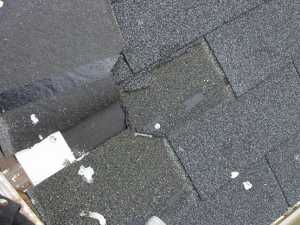
STEP 2:
You will need to remove the broken section by pulling the nails. Using a new roofing nail, fix the shingle by nailing above the tab cut (typically there are 3 nails per full shingle)
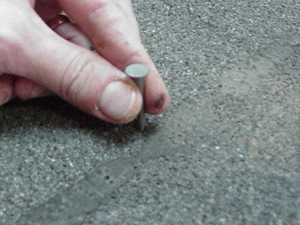
STEP 3:
With the old shingle fragments removed, measure for the replacement shingle. You can
cut the shingle to size by scoring it with a utility knife.
STEP 4:
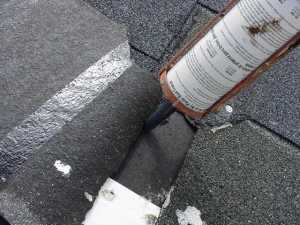
You will need to seal both on top and below of the replacement shingle. I suggest using a caulking gun and a tube of roof cement. Be sure to cover the entire area which will be covered by the tab.
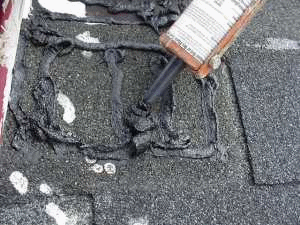
STEP 5:
Before you leave, check for other loose shingles by lifting the edges and see if the self-sealing contact is not bonded. If need be, simply apply a liberal amount of roof compound about 1" from the edge of the tab.
Method #2 of Repairing Damaged Shingles
Step 1:
This procedure is best done while the shingles are warm and flexible. If you're working during winter, wait until the sun warms the shingles up. Working with a long scraper, pry the tabs of the damaged shingle loose. The shingles are held down by a tar strip. Now pry the tabs from the shingles one course up which covers the damaged shingle. Be careful not to tear these shingles.
Step 2:
Take the flat stock or nail-puller and pull the roofing nails from the damaged shingle. It may take some effort. This isn't recommended, but if you can't get the nails out, remove the bits of shingle from under the head of the nail and drive the nail flat. Slide out the damaged shingle and make sure that the roof deck is undamaged. If it is damaged, you should probably call a professional.
Step 3:
Slide the new shingle up into position and, just above the tar strip, secure the shingle with 3 roofing nails.
This article does not necessarily reflect the views of 411 Home Repair and is only suggestions and/or comments submitted to our site to share with our site viewers through the world wide web.
Popular Articles
Three Places to Spend Money on the Exterior of Your Home
When you have the exterior of your home remodeled, you are investing, time, energy and convenience into the project and you want to make sure that...
110149 Views
Homemade Headboards-Make an Upholstered or Wooden Headboard
Homemade headboards can add a lot of personality to any bedroom. They can be coordinated with existing furniture and room decor or they can be the...
81605 Views
When to Use a Brush, Roller or Sponge Brush
Brushes are a good choice for painting trim and woodwork. They are also useful for cutting in the edges around the top and bottom edges and corners...
74572 Views
Creating a Cottage Kitchen with Bead Board
Kitchen decor can range from modern and bold to elegant and elaborate by using strategic kitchen pieces. One of the most popular decorating trends...
59960 Views
Gas Fireplace Diagnostics and Troubleshooting
Follow these steps for diagnosing and troubleshooting Gas Fireplaces repairs. For the average DIYer, this may seem intimidating, depending on the...
36786 Views
Latest Articles
How to Fix Water Marks on Bathroom and Kitchen Faucets
Water marks on faucets can make an otherwise clean kitchen or bathroom look untidy. These marks often appear as white spots, cloudy patches, or...
on Nov 7, 2026
Signs You Need Professional Plumbing Repair: Don’t Ignore These Warning Signs
Ignoring the signs of a pending plumbing disaster can lead to significant damage and costly repairs. For instance, homeowners might not realize...
on Jan 20, 2026
Beneath the Surface: Why Professional Trenchless Sewer Line Repair
Beneath the Surface: Why Professional Trenchless Sewer Line Repair is Essential for Modern Homeowners
on Jan 14, 2026
Hydro Jetting Services: Unclog Your Pipes with the Power of Water
When faced with stubborn clogs and slow drains, conventional solutions often fall short. But with the innovation of hydro jetting services,...
on Dec 15, 2025
Why Professional Heat Pump Installation is Key to Maximizing Efficiency and Longevity
Heat pumps are a highly efficient means of heating and cooling homes, reducing energy costs and contributing to environmental sustainability. To...
on Dec 15, 2025
Featured Articles
What Type of Licensed Contractor Should You Hire?
on Feb 28, 2017
Hire Contractors / Estimates
Looking for a specialty project? There are many types of contractors available for your home improvement needs. Finding the right type of...
Actions
Top Categories
- Garden / Landscaping / Patio — 264
- Kitchen / Bathrooms — 240
- Real Estate / Finance — 203
- Appliance / Repair — 186
- Interior Design / Decor — 184
- HVAC / Air Conditioning — 150
- Cleaning / Maintenance — 144
- Improvements / Remodeling — 131
- Plumbing / Basements — 121
- Floors / Tile / Hardwood — 116
- Safety / Security — 114
- Doors / Garages — 113
Articles Archive
More DIY Articles
Total Plant Health Care (TPHC)
Total Plant Health Care (TPHC) is a holistic approach to the cultural, environmental and human inputs to which our plants are subject....
Woodworking Safety Part I: Appropriate Woodshop Attire
In addition to using caution and common sense when operating power tools, woodworkers should always be dressed for safety and wear the necessary...
Don’t Buy a New Appliance if It’s Still Possible to Repair It
It is frustrating when you realize that you can no longer use your appliance at home. You might think that the only option is to dispose of it. The...
Top Stainless Steel Appliances for Your Kitchen
We cannot stress enough the importance of a well-designed and equipped kitchen. When it comes to updating one room in the house, the kitchen is the...
Damaged Concrete Repair Tips
Concrete is certainly one of the most durable building materials, but it is not indestructible. Over time, stains, cracks and flaking can ruin the...