How to Build a Simple Set of Stairs
by Guest Post on Nov 5, 2014
Stairs are the standard, most basic method of getting from one level of our homes to the next. But building a safe and functional set of stairs can be a daunting and even challenging. Happily, these basic step-by-step instructions in this guide will help you rise to the challenge of building your first set of stairs.
First - Measure & Cut the Stringers and Risers
Our first step is to measure the length or distance of the staircase and cut the stringers to fit (be sure to measure to the final upper and lower floor levels for new construction). For a solid set of stairs, cut three stair stringers from 2" x 12" lumber. The third-stringer for the center of the steps gives the extra support for a nice solid and secure feel while going up or down the stairs Next you will want to put a small notch in the bottom of the stringers to fit over a small piece of 2" x 4" lumber which will be used to anchor the bottom of the staircase. All 3 stringers should be notched in the same manner.
Now for the stair treads, you will want to cut 10" treads from 2" x 10" lumber. The 7" risers will come from OSB sheets. You will also need a single piece of treated 2" x 4" lumber cut to a 3-foot length that will sit on the bare concrete floor and will secure the bottom of the staircase.
Next - Install the Bottom Anchor 2x4s
Place one of the stringers in its spot against the wall and have an assistant keep it firmly in place. Position into the notch the treated 2" x 4" then push it firmly against the wall. Drill through the 2" x 4" with a masonry bit into the concrete floor, and use concrete screws or nails to attach the 2" x 4" to the concrete floor.
After That - Attach the Stringers
Now you can connect the top stair support with the metal brackets and then toenail the first stringer to the 2" x 4" on the concrete floor. At the other end of the 2" x 4”, connect the second-stringer in the same way. Now you can place and connect the third-stringer midway between the first two outside ones.
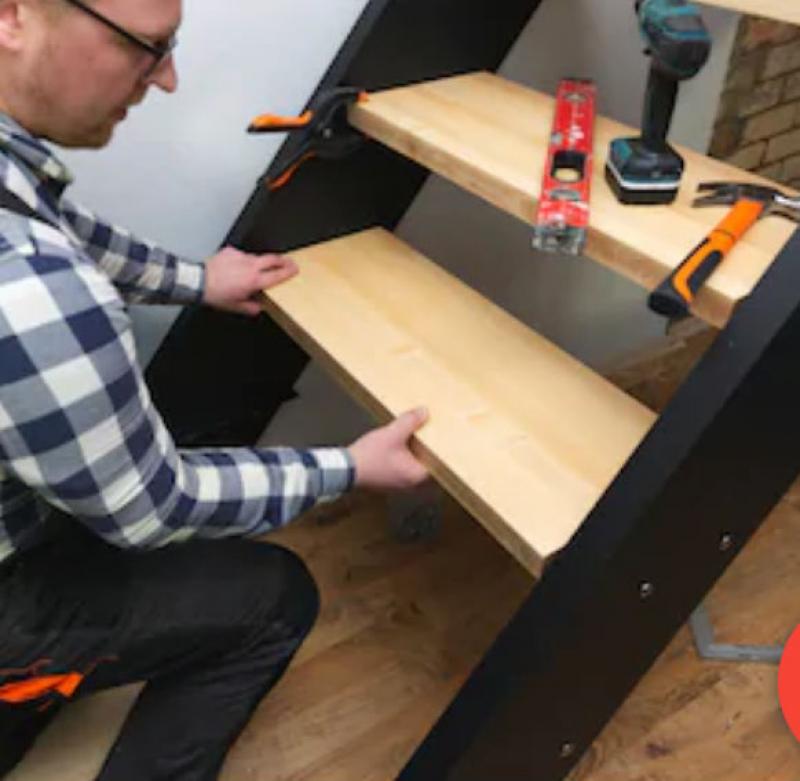
Last Step - Install the Stair Treads
With the three stringers firmly in place, you can now nail each of the 2" x 10" stair treads into the center of each stringer. Be careful to center the nail in each stringer so as not to split any of the stringers. After attaching all of the stair treads, you can nail the OSB risers into the center of each stringer. Once again be sure to center the nails in each stringer.
And that’s the final step. Now that you are all done with the stairs, you can finish them with either tile, carpet, or any manner you choose. For additional ease of use, you may want to add in a wooden stair railing.
Popular Articles
Three Places to Spend Money on the Exterior of Your Home
When you have the exterior of your home remodeled, you are investing, time, energy and convenience into the project and you want to make sure that...
108356 Views
Homemade Headboards-Make an Upholstered or Wooden Headboard
Homemade headboards can add a lot of personality to any bedroom. They can be coordinated with existing furniture and room decor or they can be the...
81273 Views
When to Use a Brush, Roller or Sponge Brush
Brushes are a good choice for painting trim and woodwork. They are also useful for cutting in the edges around the top and bottom edges and corners...
74211 Views
Creating a Cottage Kitchen with Bead Board
Kitchen decor can range from modern and bold to elegant and elaborate by using strategic kitchen pieces. One of the most popular decorating trends...
59643 Views
Gas Fireplace Diagnostics and Troubleshooting
Follow these steps for diagnosing and troubleshooting Gas Fireplaces repairs. For the average DIYer, this may seem intimidating, depending on the...
36523 Views
Latest Articles
Signs You Need Professional Plumbing Repair: Don’t Ignore These Warning Signs
Ignoring the signs of a pending plumbing disaster can lead to significant damage and costly repairs. For instance, homeowners might not realize...
on Jan 20, 2026
Beneath the Surface: Why Professional Trenchless Sewer Line Repair
Beneath the Surface: Why Professional Trenchless Sewer Line Repair is Essential for Modern Homeowners
on Jan 14, 2026
Hydro Jetting Services: Unclog Your Pipes with the Power of Water
When faced with stubborn clogs and slow drains, conventional solutions often fall short. But with the innovation of hydro jetting services,...
on Dec 15, 2025
Why Professional Heat Pump Installation is Key to Maximizing Efficiency and Longevity
Heat pumps are a highly efficient means of heating and cooling homes, reducing energy costs and contributing to environmental sustainability. To...
on Dec 15, 2025
Why Professional Boiler Repair is Essential for Home Safety and Comfort
Maintaining a warm and safe home environment is paramount for any homeowner. Your home's boiler system plays a critical role in this, but what...
on Nov 5, 2025
Featured Articles
What Type of Licensed Contractor Should You Hire?
on Feb 28, 2017
Hire Contractors / Estimates

Looking for a specialty project? There are many types of contractors available for your home improvement needs. Finding the right type of...
Actions
Top Categories
- Garden / Landscaping / Patio — 264
- Kitchen / Bathrooms — 240
- Real Estate / Finance — 203
- Appliance / Repair — 186
- Interior Design / Decor — 184
- HVAC / Air Conditioning — 150
- Cleaning / Maintenance — 144
- Improvements / Remodeling — 131
- Plumbing / Basements — 121
- Floors / Tile / Hardwood — 116
- Safety / Security — 114
- Doors / Garages — 113
Articles Archive
More DIY Articles
What Is the Best Method for Foundation Repair? | A Homeowner’s Guide
If you need a foundation repair, it is good to familiarize yourself with various repair methods available. You can then better understand why a...
6 Ways to Allow Your Home Decor to Reflect Your Personal Style
After a long day in the world, your home should serve as your oasis. With the right personal touches, any home can feel comfortable and cozy day in...
Difference of Split and Ducted Reverse Cycle Air Conditioning
Having an air conditioning system will save you from being uncomfortable because of constant weather changes. To save money on buying an air...
Artech Stone, Bringing Out Perfect Finish and Beauty for Your Floors
Artech Stone Pty Ltd offers foremost resurfacing solutions after a complete analysis of the surface. Artech Stone crew provides you cutting- edge...
Choosing The Right Breed of Dog for Home Security Purposes
Nowadays, dogs are not only associated with the zone of man’s best friend but you can take help of your furry little friend in order to protect...