Build a Rustic Bench by Recycling an Old Window
by Guest Post on Dec 19, 2010
The pastor of our church replaced the windows in his sunroom and rather than toss the drafty old ones, he called me. He knows I can't throw anything away. I look at everything and see the potential. I sent my son to pick them up and was stunned to see his pickup piled high when he returned.
Hmmm, those who live in glass houses? Well, I certainly had enough windows to build a glasshouse, but I decided to start small with my husband's assistance. We decided on a window bench.
The windows were wonderful. The panes even had the watery character of age. All window worship aside, though, there was quite a lot of prep work before we could even start the construction of the bench. The caulking on the window we chose was old, cracked and missing in quite a few places. To ensure the bench would be safe and usable once it was built, we had to remove the caulking and replace it. The window resembled a French door, with multiple panes. We did one side of the window, allowed the caulking to dry and turned it over to do the other side.
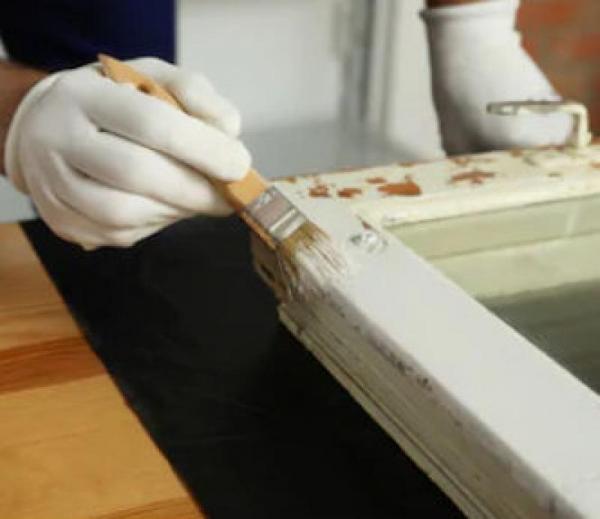
With the windows recaulked, it was time to make the bench. Well, not quite. Since there were so many window panes, we decided to paint the window with our chosen bench color before we built the bench. This made painting so much easier because we were able to lay the window flat and didn't have to work at odd angles. We chose a barn red color.
Materials for Making a Window Bench:
- Old window
- Caulk
- Measuring tape
- 7-inch wide board scraps, 3/4 inch thick
- 1x4's
- 4x4's
- 1x2's
- Miter saw
- Jigsaw
- Table saw
- Drill, a small bit, screwdriver bit
- 1 1/4 inch wood screws
- 2 1/2 inch wood screws
- Paint brush
- Palm sander
Steps for Building a Window Bench:
Step 1:
Create the bench seat. Measure the bottom edge of the window. This will be the length of your bench. Cut two-3/4 inch thick boards the length of your bench by approximately 7 inches wide, for the seat. Be thrifty and use scrap wood if you have it. The bench will be painted and will hide any irregularities. Lay the boards side-by-side to measure 14 inches wide. Cut three-1x4's, 14 inches long, for the seat braces. Place one brace on top and across each end of the seat boards and one across the middle. Drill pilot holes with a small drill bit through the braces and into the seat boards. Attach the braces to the seat with 1 1/4 inch wood screws in each of the pilot holes.
Step 2:
Create a collar around the seat. Cut two-1x4's, 14 inches long. Lay the bench seat with the braces on the top. Stand the 1x4's on your work surface, against the short end edges of the seat. Drill pilot holes through the 1x4's and into the side end edges of the seat. Attach using 1 1/4 inch wood screws. Measure the length of the seat, plus the additional thickness of the attached 1x4 ends. Use this measurement to cut one more 1x4. Stand the long 1x4 on your work surface, against the one edge of the seat. Attach in the same way as the end boards. Your seat now has a collar with an open back.
Step 3
Cut four-4x4 legs, 17 inches long. In my case, the window was long, so I cut two more legs to add support to the center of the bench. Stand the legs and place the bench seat, brace side down, on the legs. Fit the tops of two legs into the front corners of the seat collar and the other two flush with the back edge of the seat and the short collar ends. For the front legs, drill four pilot holes through the front collar board and into the legs and four pilot holes through the collar side and into the legs. Attach the legs using 2 1/2 inch wood screws. For the back legs, drill pilot holes through the short collar boards and into the legs and attach with wood screws. Turn the bench over and stand it on the legs. Drill four pilot holes through the top of the bench seat and into the top of each leg. Insert 2 1/2 inch screws to secure.
Step 4
Set the window on the back top edge of the bench. Measure from the floor to the top of the window. Use this measurement to cut two-1x2s for the window bench back brace. Turn the bench with the back facing you. Stand one back brace against a back leg, with the edge flush with the outer leg edge. The brace will extend above the bench. Drill pilot holes through the brace and into the top and bottom of the leg. Attach with 2 1/2 inch screws. Repeat with the remaining brace and back leg. Set the window on the bench and place it against the extended braces. Working from the back, drill through the brace and into the top and bottom of the window frame. Attach using 1 1/4 inch screws.
Step 5
Cut a 1x4 for the top of the armrest, 12 1/2 inches long. Cut two-2x2 armrest legs, 7 1/2 inches long. Center an armrest leg under the 1x4 armrest top, along one end. Drill two pilot holes through the armrest top and into the top of the leg. Attach with 1 1/4 inch screws. Repeat with the other leg on the opposite end of the armrest top. Stand one constructed armrest on one end of the bench, with one armrest leg against the window. The end of the armrest top will rest flush against the window with one edge even with the side of the window. Space and drill three pilot holes through the leg and into the window. Attach using 1 1/4 inch screws. Diagonally drill two pilot holes through opposite sides of the front armrest leg and into the top of the bench seat. Attach using 1 1/4 inch screws. Attach the remaining armrest in the same way.
Step 6
Paint the entire bench with the same color paint used on the window. Paint over the screw heads and touch up the paint on the window. Allow the paint to dry thoroughly. Use a palm sander to distress the surface and the edges of the bench, giving it an aged rustic look.
Credit: Cyndee Kromminga | © Cyndee Kromminga
Popular Articles
Three Places to Spend Money on the Exterior of Your Home
When you have the exterior of your home remodeled, you are investing, time, energy and convenience into the project and you want to make sure that...
88494 Views
When to Use a Brush, Roller or Sponge Brush
Brushes are a good choice for painting trim and woodwork. They are also useful for cutting in the edges around the top and bottom edges and corners...
69974 Views
Homemade Headboards-Make an Upholstered or Wooden Headboard
Homemade headboards can add a lot of personality to any bedroom. They can be coordinated with existing furniture and room decor or they can be the...
69693 Views
Creating a Cottage Kitchen with Bead Board
Kitchen decor can range from modern and bold to elegant and elaborate by using strategic kitchen pieces. One of the most popular decorating trends...
48375 Views
Gas Fireplace Diagnostics and Troubleshooting
Follow these steps for diagnosing and troubleshooting Gas Fireplaces repairs. For the average DIYer, this may seem intimidating, depending on the...
29059 Views
Latest Articles
Understanding Indonesia’s Real Estate Investment Laws for Foreigners
Indonesia, with its stunning landscapes, deep-rooted cultural heritage, and renowned hospitality, has emerged as a top destination for foreigners...
on Jan 25, 2024
Real Estate Development in Asian Cities
In many Asian cities, the rapid pace of urban development has led to the decline of historic districts, areas once teeming with cultural richness...
on Jan 25, 2024
Shower Envy: Elevating Your Bathroom with a Stunning Walk-In Shower
Are you tired of the same old routine in your bathroom? It might be time to consider a change, and one way to elevate your bathroom to a new level...
on Jan 22, 2024
Exploring Crowdfunding as an Innovative Approach to Real Estate Investment
The landscape of property selling has been transformed significantly due to the advent of property crowdfunding. This innovative approach,...
on Jan 10, 2024
The Rise of Co-Living Spaces in Asian Cities
Asia, home to 21 of the worlds 30 largest cities, is a significant player in the global economy, contributing 38% of the goods and services of the...
on Jan 5, 2024
Featured Articles
What Type of Licensed Contractor Should You Hire?
on Feb 28, 2017
Hire Contractors / Estimates

Looking for a specialty project? There are many types of contractors available for your home improvement needs. Finding the right type of...
Actions
Top Categories
- Garden / Landscaping / Patio — 263
- Kitchen / Bathrooms — 240
- Real Estate / Finance — 200
- Appliance / Repair — 186
- Interior Design / Decor — 184
- HVAC / Air Conditioning — 147
- Cleaning / Maintenance — 144
- Improvements / Remodeling — 131
- Plumbing / Basements — 118
- Floors / Tile / Hardwood — 115
- Doors / Garages — 113
- Safety / Security — 112
Articles Archive
More DIY Articles
Energy Tax Credit for Windows
You can claim your energy tax credit for home improvements by using online tax software. You will be sure to get the full tax credit for your home...
Understanding the Importance of Building Information Modeling
We can consider The Building Information Modeling to be the most successful leap in the history of Civil and Architectural Engineering and now, it...
Five Tips for Purchasing a Backhoe Loader
With prices starting at $50,000 for a used model, buying a backhoe loader is not like buying the Tonka toy of your childhood. You can't go into a...
4 Tips on How to Get the Best Roofing Company
A home is one of the most valuable assets one can own. As a homeowner, you should do everything to ensure that your home is beautiful. Investing in...
5 Reasons to Let a Professional Plumber Handle That Plumbing Job
When it comes to home improvement, some homeowners swear by having a professional do it while others would rather opt for the DIY route. While...