Designing and Building an Arbor
by Dan Eskelson on Apr 28, 2012
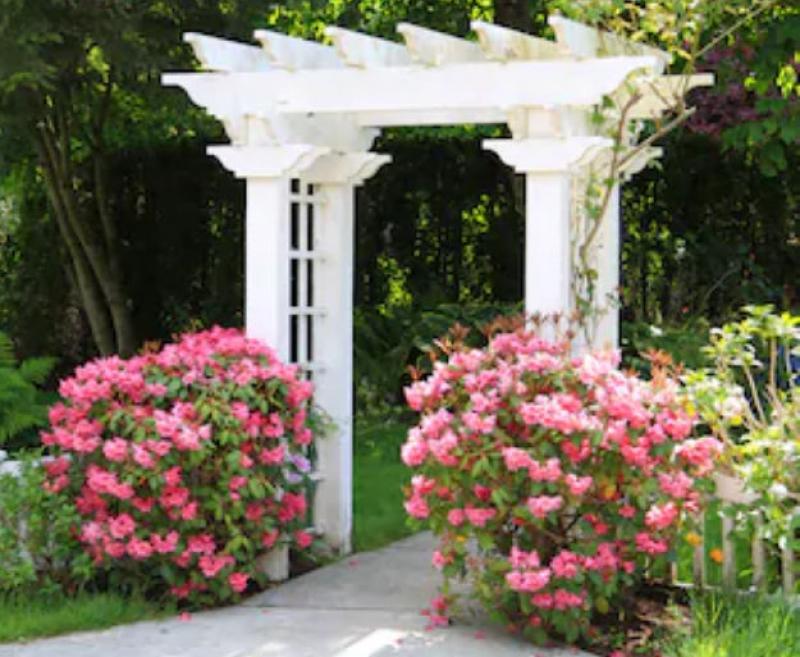
Few projects are as easy to build or as beautiful to look at as an arbor. An arbor can grace a garden pathway, hide a neighbor's home or house your front gate. It's no wonder that people have been raising them for thousands of years.
We suggest building your arbor from pressure-treated lumber or rough-cut redwood. It's cheaper than dressed lumber and, left unpainted and covered with wisteria, it's sure to age handsomely. All kinds of climbing flowers love arbors: bougainvillea, clematis, honeysuckle, trumpet vine, wisteria and, of course, climbing roses. If you like variety, consider the climbing annuals: sweet pea, morning glory, nasturtium. You'll replant them each spring, but that's half the fun.
Construction
Don't overbuild your arbor, whatever you plant to climb the arbor will support itself to a large degree. Four-by-4s or 6-by-6s will be more than adequate for arbor posts. By and large, build horizontal crossbeams out of 2-by-6s or 2-by-8s. and the top level of crosspieces is typically fashioned from 2-by-3s. Keep it light: an arbor should leap upward like a tree, with a canopy that's proportional to its posts.
If you use pressure-treated lumber, you can just sink the posts into the ground, provided there's decent drainage in that area. Yes, we know about pier blocks and post anchors, but we've sunk redwood and pressure-treated southern pine posts 30 years ago that are still standing. For an 8-foot-high post, dig the posthole 1 foot across and at least 2 feet deep. Order enough 3/8-inch gravel to fill the bottom of each hole 6 inches deep.
For plumbing posts (that is, making them perfectly vertical), nothing beats foundation stakes, the perforated steel rods ordinarily used to bolster concrete foundation footings. First, plumb the post with a carpenter's level.
T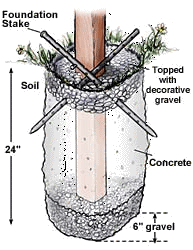 hen, using one face of the post as a guide, drive a foundation stake diagonally into the soft dirt around the hole. Hammer a double-headed nail through the stake into the post. Check plumb again and drive a second foundation stake in at a right angle to the first, and nail it to the post. Check for plumb one last time and fill the hole with concrete. Let the posts set for a day or two. When the concrete is dry, pull out the foundation stakes and top the hole with gravel for good drainage.
The rest is straightforward. It's easiest to cut all beam and crosspiece ends now, before you attach them to the posts. While you're still on solid ground, also drill the holes for any nails, screws or bolts you'll use to attach the wooden members.
That done, you're ready to attach the beams and crosspieces. You'll need a sturdy stepladder, a carpenter's level, a tape measure, and; depending on whether you nail or lag-bolt elements together - - a hammer or a drill, a 3/8-inch spade bit and a socket wrench. a helper will make the job easier, too.
Start by tacking (temporarily attaching) one end of a beam to a post. Use your carpenter's level to level it, then tack the second end. If you're putting up a pair of beams, level the second to the first. When you're happy with their positions, nail or screw them all the way. as you'll note in the illustration, we prefer to use 3/8-inch lag bolts with washers. Once the beams are secured, the rest is a cakewalk: Use your tape measure to space the crosspieces, then nail or screw the crosspieces atop the beams in their predrilled holes. We used 10d box nails because their shanks are skinnier than common nails.
Design Portfolio
Arbors are remarkably adaptable. You can cut designs into the ends of the arbor beams or arch the beams to dramatically change the overall look of the structure. By varying the spacing of the crosspieces, you can make your arbor feel open and airy or snug and cozy.
If your arbor will shelter your front gate, try repeating some of the architectural elements of your house in the arbor's design. That way, you can tie it aesthetically to the house. Or you can dress up your arbor by painting it the same color as your window trim. anything goes.
Because design elements often repeat themselves, cut out all beams and crosspieces at the same time, so attaching them to the post goes quickly.
A jigsaw works fine for the task, but a band saw is even better if you have one or have access to one. First, make a template of heavy paper or cardboard. Trace the uncut beam end on the paper, then sketch different profiles on the t ng. Cut out the one you like best and use it to trace the profile on the wood. Cut the end, and then use that piece as a pattern for the remaining cuts.
Lastly, notched arbor pieces can be handsome and are generally stronger. But they're also much more complicated. The beauty of the construction sequence above is its simplicity: you can level crosspieces in place after the posts are erected. If a post is too long, just trim it off. Notched post-beam construction, on the other hand, requires setting posts to an exact depth or notching a post in place while perched atop a stepladder.
Tools
- Carpenter's level
- Hammer
- Jigsaw or band saw
- Cordless drill
- 3/8-inch spade bit
- Stepladder
- Tape measure
- Socket wrench
Materials
- 8d double-headed nails
- 10d box nails (galvanized)
- 3/8-inch gravel
- 3/8-inch lag bolts
- Concrete
- Perforated foundation stakes
Popular Articles
Three Places to Spend Money on the Exterior of Your Home
When you have the exterior of your home remodeled, you are investing, time, energy and convenience into the project and you want to make sure that...
108281 Views
Homemade Headboards-Make an Upholstered or Wooden Headboard
Homemade headboards can add a lot of personality to any bedroom. They can be coordinated with existing furniture and room decor or they can be the...
81258 Views
When to Use a Brush, Roller or Sponge Brush
Brushes are a good choice for painting trim and woodwork. They are also useful for cutting in the edges around the top and bottom edges and corners...
74198 Views
Creating a Cottage Kitchen with Bead Board
Kitchen decor can range from modern and bold to elegant and elaborate by using strategic kitchen pieces. One of the most popular decorating trends...
59630 Views
Gas Fireplace Diagnostics and Troubleshooting
Follow these steps for diagnosing and troubleshooting Gas Fireplaces repairs. For the average DIYer, this may seem intimidating, depending on the...
36511 Views
Latest Articles
Signs You Need Professional Plumbing Repair: Don’t Ignore These Warning Signs
Ignoring the signs of a pending plumbing disaster can lead to significant damage and costly repairs. For instance, homeowners might not realize...
on Jan 20, 2026
Beneath the Surface: Why Professional Trenchless Sewer Line Repair
Beneath the Surface: Why Professional Trenchless Sewer Line Repair is Essential for Modern Homeowners
on Jan 14, 2026
Hydro Jetting Services: Unclog Your Pipes with the Power of Water
When faced with stubborn clogs and slow drains, conventional solutions often fall short. But with the innovation of hydro jetting services,...
on Dec 15, 2025
Why Professional Heat Pump Installation is Key to Maximizing Efficiency and Longevity
Heat pumps are a highly efficient means of heating and cooling homes, reducing energy costs and contributing to environmental sustainability. To...
on Dec 15, 2025
Why Professional Boiler Repair is Essential for Home Safety and Comfort
Maintaining a warm and safe home environment is paramount for any homeowner. Your home's boiler system plays a critical role in this, but what...
on Nov 5, 2025
Featured Articles
What Type of Licensed Contractor Should You Hire?
on Feb 28, 2017
Hire Contractors / Estimates

Looking for a specialty project? There are many types of contractors available for your home improvement needs. Finding the right type of...
Actions
Top Categories
- Garden / Landscaping / Patio — 264
- Kitchen / Bathrooms — 240
- Real Estate / Finance — 203
- Appliance / Repair — 186
- Interior Design / Decor — 184
- HVAC / Air Conditioning — 150
- Cleaning / Maintenance — 144
- Improvements / Remodeling — 131
- Plumbing / Basements — 121
- Floors / Tile / Hardwood — 116
- Safety / Security — 114
- Doors / Garages — 113
Articles Archive
More DIY Articles
How to Pick the Right Tankless Water Heater for You
Though tankless water heaters were once expensive appliances that could not quite meet the demands of a large family, new technology has changed...
Lighting Your Entryway for Safety
Having appropriate lighting for the entryway is important for any home. Strategically placed and adequately bright, entryway lighting can deter...
Tips on Selling Your Home Fast
In a perfect world, everybody needs their house to sell fast at the cost they want, yet obviously, you can't expect the same from buyers (What if...
Top 4 Window Blind Styles
Blinds are important for a variety of reasons. Firstly, they stop light from flooding into your home. They also provide privacy and can even be...
Are Your Pipes Bad? 5 Signs and Symptoms of Failing Plumbing
Keeping your plumbing in good working order and scheduling fixes as soon as they are needed keeps repair costs low. The longer you put off certain...